الإجابة المختصرة: استخدم هذا فقط للصور التي تملكها أو يُسمح لك بتعديلها. أسرع مسار هو مزيل علامات مائية بالذكاء الاصطناعي للمرور الأول، ثم لمسة فرشاة يدوية حيث يترك الذكاء الاصطناعي لطخة، عادةً على الوجوه أو الأيدي أو النصوص الدقيقة. يمنحك سير العمل الهجين هذا السرعة والتفاصيل الطبيعية معًا في أقل من دقيقة لكل صورة.
استخدم هذا الدليل فقط للصور التي تملكها أو يُسمح لك بتعديلها. يشمل ذلك صورك الخاصة، والملفات المرخصة التي اشتريتها، أو المعاينات التي يُسمح لك بتنظيفها بعد الشراء.
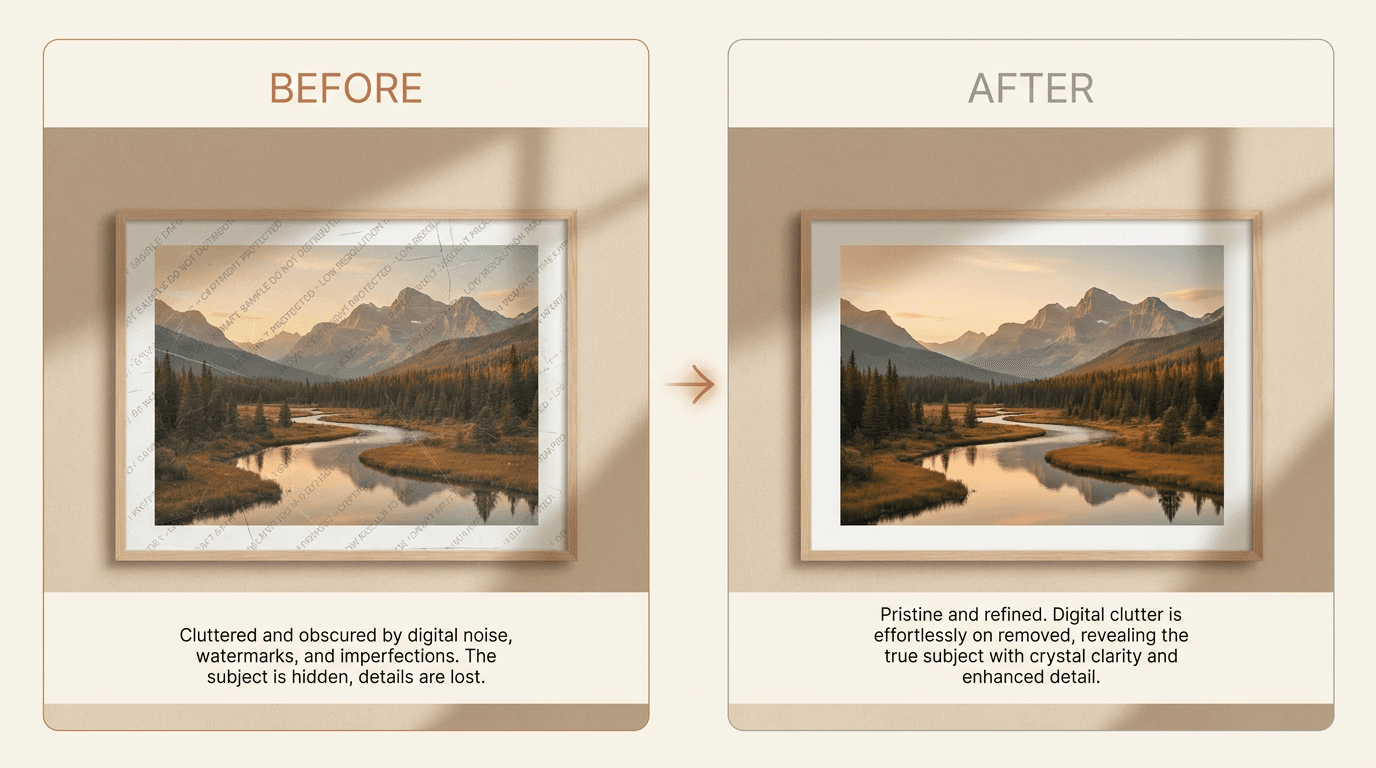
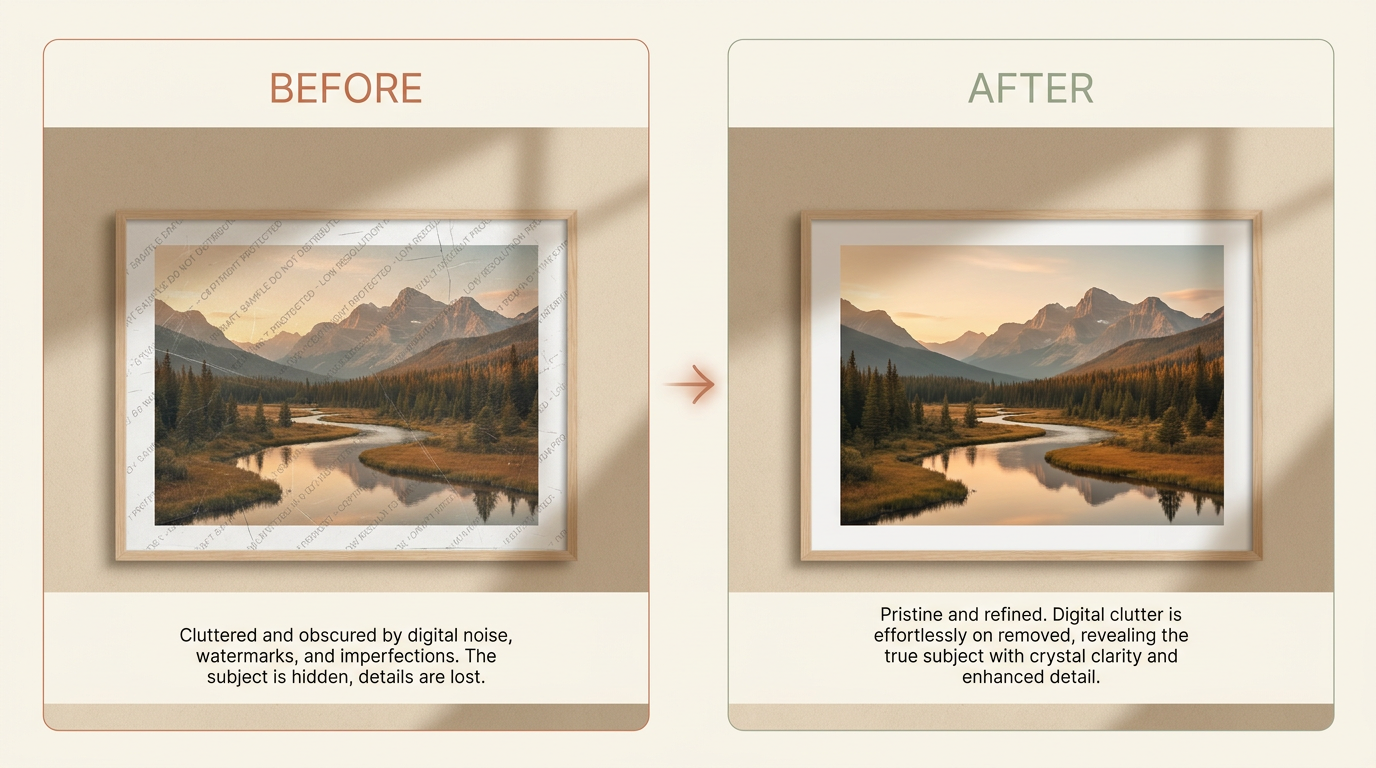
إزالة علامة مائية سهل أن يتم بشكل سيء. الجزء الصعب هو الحفاظ على الصورة طبيعية بعد إزالة العلامة.
يشرح هذا الدليل متى تعمل أدوات الذكاء الاصطناعي بشكل جيد، ومتى يكون التعديل اليدوي أفضل، وما يمكنك فعله لتجنب نتيجة ضبابية أو تبدو غير حقيقية.
إجابة سريعة
إذا كانت الصورة ملكك أو لديك إذن واضح لتعديلها، فإن مزيل العلامات المائية بالذكاء الاصطناعي هو عادة أسرع مكان للبدء.
يعمل بشكل أفضل عندما:
- تكون العلامة المائية صغيرة أو متوسطة الحجم
- تكون الخلفية خلفها بسيطة
- لا تغطي العلامة وجهًا أو يدًا أو نسيجًا مفصلاً
إذا كانت العلامة المائية تمر عبر تفاصيل دقيقة، فإن خطوة التعديل اليدوي غالبًا ما تعطي صورة نهائية أفضل.
متى يكون من المنطقي إزالة علامة مائية؟
قد تحتاج إلى إزالة علامة مائية عندما:
- تملك الصورة وتريد نسخة نظيفة
- اشتريت ترخيصًا وحصلت فقط على معاينة بعلامة مائية
- أضافت الكاميرا الخاصة بك ختم تاريخ أو علامة أخرى لا تريدها
- صورة قديمة بها تلف يبدو كعلامة مائية
قبل أن تبدأ
تحقق من هذه الأمور أولاً:
- تأكد أن لديك الحق في تعديل الصورة
- ابحث عن أعلى جودة نسخة يمكنك الحصول عليها
- احفظ نسخة احتياطية قبل تغيير أي شيء
- قم بالتكبير وادرس ما يقع خلف العلامة المائية
هذه الخطوة الأخيرة مهمة. السماء المسطحة سهلة الإصلاح. الشعر، العيون، النصوص، وخطوط المباني أصعب.
نصيحة احترافية: ابدأ بأكبر ملف مصدر لديك. إزالة علامة من صورة بدقة كاملة يمنح الذكاء الاصطناعي بكسلات أكثر للعمل بها مما توفره لقطة شاشة صغيرة على الإطلاق.
الطريقة 1: استخدم أداة الذكاء الاصطناعي أولاً
أداة الذكاء الاصطناعي هي أفضل خطوة أولى لمعظم الناس لأنها سريعة وتعطيك مسودة قوية في مرور واحد.
إزالة العلامات المائية الجيدة بالذكاء الاصطناعي تتبع هذا النمط عادةً:
- ارفع الصورة
- حدد المنطقة التي يجب إزالتها
- دع النموذج يعيد بناء الخلفية المخفية
- راجع النتيجة بالحجم الكامل
- قم بمرور ثانٍ إذا بقي عيب صغير
يعمل هذا جيدًا لأن النموذج يفعل أكثر من مجرد طمس المنطقة. إنه يحاول إعادة بناء الأشكال والضوء واللون والنسيج حول الجزء المفقود، عادةً في أقل من دقيقة لكل صورة.
متى تبدو إزالة الذكاء الاصطناعي جيدة؟
غالبًا ما تعمل أدوات الذكاء الاصطناعي جيدًا عندما تقع العلامة المائية على:
- السماء
- الجدران
- الرمل
- العشب
- قماش عادي
- خلفيات غير واضحة
متى تحتاج إزالة الذكاء الاصطناعي للمساعدة؟
نتائج الذكاء الاصطناعي أقل موثوقية عندما تغطي العلامة المائية:
- العيون أو الأسنان
- الأصابع
- خطوط المباني المستقيمة
- نص مفصل
- المجوهرات
- قماش منقوش
في هذه الحالات، استخدم الذكاء الاصطناعي للمرور الأول ثم نظف العيوب الأخيرة يدويًا.
الطريقة 2: عدلها يدويًا
التعديل اليدوي يستغرق وقتًا أطول، لكنه يمنحك تحكمًا أكبر.
استخدمها عندما:
- تكون العلامة المائية على وجه
- تبدو نتيجة الذكاء الاصطناعي ناعمة أو مشوهة
- تحتاج إلى حماية الحواف الحادة أو النص
- تبقى علامات صغيرة قليلة بعد المرور الأول
يستخدم معظم المحررين مزيجًا من هذه الأدوات:
- امسح فوق منطقة العلامة المائية بفرشاة
- استخدم أدوات التعبئة الذكية (inpainting) أو الإصلاح (healing)
- انسخ بكسلات نظيفة من منطقة قريبة
- أصلح الحواف قسمًا تلو الآخر
اعمل ببطء. الضربات القصيرة والدقيقة تبدو عادة أفضل من رقعة كبيرة واحدة.
إزالة الذكاء الاصطناعي مقابل التعديل اليدوي: أيهما يجب أن تستخدم؟
معظم الناس لا يضطرون إلى اختيار طريقة واحدة للصورة بأكملها. الإجابة السريعة هي البدء بالذكاء الاصطناعي، ثم اللجوء إلى الأدوات اليدوية فقط حيث لا تزال النتيجة تبدو غير مرضية.
| إزالة الذكاء الاصطناعي | التعديل اليدوي | |
|---|---|---|
| السرعة | أقل من دقيقة لكل صورة | عدة دقائق إلى ساعة |
| المهارة المطلوبة | لا شيء، ارفع وحدّد المنطقة | إلمام بالفرش والاستنساخ والإصلاح |
| الأفضل لـ | الخلفيات البسيطة أو غير الواضحة | الوجوه، النصوص، الخطوط المستقيمة، التفاصيل الدقيقة |
| نقطة الضعف | قد يلطخ المناطق المفصلة | بطيء، وسهل الإفراط في العمل يدويًا |
للحصول على مقارنة أعمق جنبًا إلى جنب، راجع إزالة العلامة المائية بالذكاء الاصطناعي مقابل التحرير اليدوي.
أفضل سير عمل لنتائج نظيفة
إذا كنت تريد أفضل نتيجة، استخدم هذا الترتيب:
- ابدأ بإزالة الذكاء الاصطناعي
- افحص الصورة بتكبير 100%
- ابحث عن اللطخات، النسيج المتكرر، أو الخطوط المكسورة
- نظف تلك البقع يدويًا
- صدر نسخة جديدة وقارنها بالأصلية
هذا السير العمل الهجين غالبًا ما يكون أفضل من استخدام الذكاء الاصطناعي فقط أو التعديل اليدوي فقط.
أخطاء شائعة تجعل الصور تبدو غير حقيقية
معظم التعديلات السيئة تأتي من نفس الأخطاء القليلة:
- إزالة منطقة كبيرة جدًا دفعة واحدة
- استخدام ملف مصدر منخفض الدقة
- ترك ضبابية ناعمة حيث يجب أن يكون هناك نسيج
- تكرار نفس النمط بطريقة مرئية
- نسيان مطابقة الظلال والضوء
إذا بدا شيء خاطئًا، تراجع واسأل سؤالًا بسيطًا واحدًا:
هل تتطابق هذه المنطقة مع الأجزاء المحيطة بها؟
إذا كانت الإجابة لا، أعد عمل هذا القسم فقط بدلاً من إعادة تشغيل الصورة بأكملها.
كيف تحافظ على جودة الصورة عالية
استخدم هذه القواعد:
- ابدأ بأكبر صورة لديك
- تجنب لقطات الشاشة إذا كان بإمكانك الحصول على الملف الأصلي
- قم بالتكبير قبل تنظيف التفاصيل الصغيرة
- أصلح قسمًا واحدًا في كل مرة على الصور المعقدة
- استخدم أكثر من مرور إذا كانت النتيجة الأولى لا تزال تبدو خشنة
- احفظ نسخة حتى تتمكن من المقارنة قبل وبعد
نصيحة احترافية: إذا كانت الصورة بها مجرد ختم تاريخ في زاوية، فهذه مهمة أسهل من شعار يمتد عبر الموضوع، راجع كيفية إزالة ختم التاريخ من صورة.
إذا كانت الصورة ستُطبع أو تُستخدم للعمل، فافحصها دائمًا على شاشة كبيرة قبل أن تعتبرها منتهية.
ماذا تتوقع من النتيجة النهائية
حتى الأدوات الجيدة لها حدود.
يمكنك غالبًا الحصول على:
- نتيجة نظيفة على الخلفيات البسيطة
- نتيجة قوية مع تنظيف يدوي بسيط على المناطق متوسطة التفاصيل
- نتيجة قابلة للاستخدام على الصور الصعبة بعد تعديل أكثر دقة
لا يجب أن تتوقع استعادة مثالية في كل مرة. إذا كانت العلامة المائية تغطي تفاصيل مهمة، فإن بعض التخمين يكون دائمًا متضمنًا.
هل من القانوني إزالة علامة مائية؟
قم بإزالة العلامات المائية فقط من الصور التي تملكها أو لديك إذن واضح بتغييرها. لا تستخدم هذه العملية لخرق حقوق النشر، العقود، المنصات، الخصوصية، أو أي قواعد قانونية أخرى.
إذا كنت تعدل عملًا لعميل أو فريق، فتأكد من وضوح الإذن قبل البدء.
التوصية النهائية
ابدأ بالذكاء الاصطناعي لأنه أسرع وعادة ما يكون جيدًا بما يكفي للمرور الأول. ثم استخدم التنظيف اليدوي فقط عندما تبدو النتيجة غير مرضية.
هذا يمنحك أفضل مزيج من السرعة والجودة.
إذا كان لديك الحق في تعديل الصورة، جرب Remove Watermark وراجع النتيجة بالحجم الكامل قبل تصدير الملف النهائي.